Getting Started With Your Website:
Uploading Your Files in an
FTP PROGRAM and FTP in cPANEL
UPLOADING FILES WITH AN FTP PROGRAM
revised August 2021
FTP stands for File Transfer Protocol, a procedure to move files between your computer and a web server. It’s 2-way; you can upload files to your website and you can download files from your website to your computer.
There are several excellent free FTP programs out there. Do a web search and research features. FTP programs we have used are Ws_FTP_Le, FileZilla, WinSCP, and CoreFTP.
Almost all FTP clients follow the same basic structure. The screenshots for the FTP application may look a bit different from yours, but most of the same settings and functions will apply. Consult your FTP client’s documentation for more information.
SETTINGS
- Click the Connect button to bring up the
Session Properties
dialogue box. - Click New to create a new connection.
- Profile Name can be anything to identify this connection
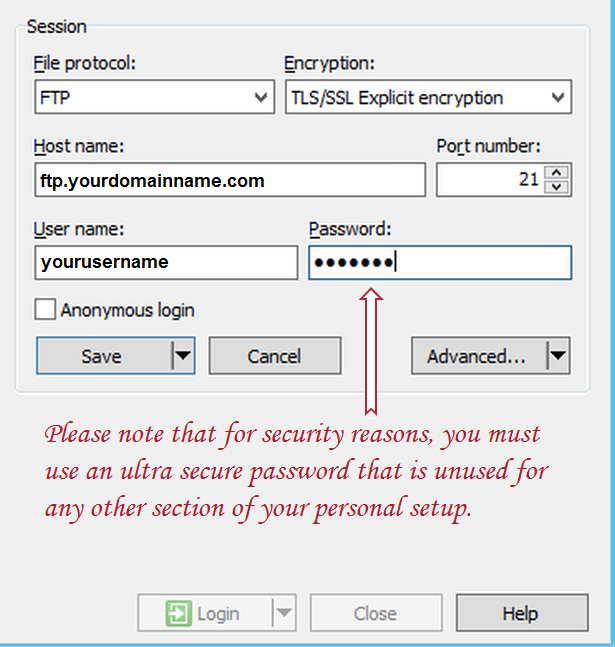
- Host Name/Address (FTP Server):
ftp.yourdomainname.com (use your actual domain name here) - User ID and password are the same as for your domain’s cPanel login. Please note that for security reasons, you must use an ultra secure password for cPanel login, that is unused for any other section of your personal setup, whether on or off your website.
- Choose Auto Detect or UNIX Standard for host type.
- Check “remember password” for easier use.
- Port is 21 (probably preset to this)
- Remote Location is
/public_html - PASV (Passive Transfer Mode)should be enabled.
- TLS/SSL Explicit encryption must be enabled. For security reasons, for FTPing, crosswinds requires that you choose explicit FTP over TLS.
- Proxy settings are used for some firewalls.
- To save settings, click Apply, and then OK to connect to your webspace.

FUNCTIONS
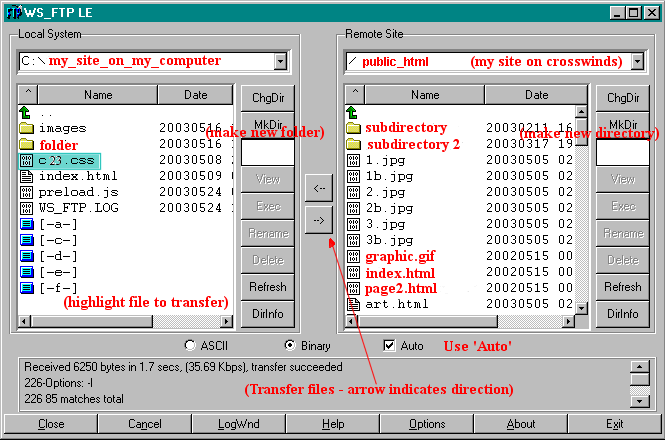
- Your computer files are shown on one side and your remote directory (website) files are on the other.
- You should be in /public_html directory. If you are not taken to /public_html, click on /public_html. This is where your home page goes, and where your website will reside.
- You move up in files/folders (hard drive) and remote directories (site) by clicking on an arrow with two dots and clicking folders.
- You can upload, download, view or edit files files, make subdirectories, change permissions, or delete.
- Before uploading, check settings for file type uploading or set to AUTO DETECT
- Text-based files (e.g. .html, .txt, .css, .javascript, .php) files must be uploaded as ASCII
- Graphics, media files, Java classes, ZIP archives, and other non-text files must be uploaded as BINARY
- Some FTP programs come with an editable list of ASCII file types. Add additional file types as needed, and then set your FTP program to Auto-detect the filetype when uploading.

Uploading
- To upload a file, highlight file from your computer directory side.
- You may upload one or many files, including entire folders.
- To upload more than one at a time, hold down CTRL key and highlight all desired files
- Make sure you have your intended target (main directory or subdirectory) for the file on site directory side.
- Click the arrow which points towards the site directory, to upload the selected file(s). Or right-click the selected files and choose “Upload”.
Tips
- Keep backup files in your computer; do not use website as only source of files.
- Keep a secondary backup on removable media (dvd, cd, flash drive…etc.)
- Arrange folder(s) on your computer with the same file structure as you made in your site directory.
- Check your page(s) on the web to make sure you have uploaded all files necessary.
FTP In cPANEL
cPanel provides an uploading utility within the File Manager. It is handy to have it available to you in cPanel, however, it is not as efficient as an FTP program.
1. In cPanel, go to File Manager.

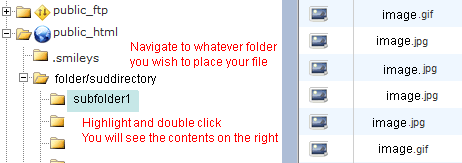
2. In your File Manager, navigate through your directory structure to the location ( folder/subfolder/main directory) that you want to place your file(s). Highlight and doubleclick until you have the files of the folder/subfolder or main directory on the right panel.

3. At the top of the screen tool-bar, click the Upload icon.

4. This is your uploading utility. Yes, you only have one file slot available to upload at a time. However, you do not have to leave this page and come back. It will inform you of completion and you may continue. If you have already uploaded a file and you are uploading an updated version, you must check “Overwrite Existing File” or it will not update the file. There is also a place to chmod the file if you need a different permission for the file(s).
