cPanel: viewing, managing, and/or renewing SSL/TLS Certificates
renew existing certificate(s) | view certificate details | manage installed SSL Websites

Your crosswinds hosted site automatically comes with a security certificate. However, this does not mean that your site is automatically secure, or that the certificate does not need renewal.
If the certificate is allowed to expire, your visitors may see messages such as “Warning: Potential Security Risk Ahead” or “Your Connection to this site is not secure” instead of your innocuous content. But rest easy, cPanel simplifies things to help you keep your certificates up to date.
You can renew these certificates manually, but with cPanel’s help, crosswinds makes sure that you can use AutoSSL to renew your certificate(s) automatically.
cPanel | Renew Certificate(s)
Use the search box to quickly find things in CPanel.
- After logging into CPanel, type “SSL/TLS” in the field at the top to easily find the application.

- To renew existing certificate(s), select the link to ‘SSL/TLS Status’ (the one with the little question mark).

- On the page that appears, check the domain(s) you want to renew and select ‘Run AutoSSL’.

When viewing the details for your domain(s), you may see “Exclude from AutoSSL”. Don’t let yourself be confused by this. The little circle with the line through that appears beside those words actually means that the domain is included for AutoSSL. - After choosing ‘Run AutoSSL’, it takes a few minutes to complete, but that’s all there is to it. Your SSL/TLS certificate(s) will now renew automatically.
Almost always….
Please note that because robots are set to complete the automatic renewal task – even though “AutoSSL attempts to automatically replace that certificate before it expires”, it is not a bad idea to make a note of the date that the certificate is set to expire. On the expiry date, log into your cPanel > SSL/TLS status to make sure that the expiring certificate really is updated. (A robot has been known to make a few errors from time to time.) If the certificate has not yet been updated, you can manually update it by choosing ‘Run AutoSSL’ for the expired certificate.
[Y]ou can enable, disable AutoSSL on any of your accounts […] [W]ith the checkboxes along the left side you can manage AutoSSL for your accounts in bulk.
[excerpt from https://blog.cpanel.com/lets-talk-autossl-the-updates/]
AutoSSL secures multiple domains with the assumption that all of the domains resolve to the same virtual host. A cPanel-issued AutoSSL certificate expires after 90 days. However, AutoSSL attempts to automatically replace that certificate before it expires.
[- excerpt from https://docs.cpanel.net/knowledge-base/security/guide-to-ssl/]
cPanel | Certificate Details
- After logging into CPanel, type “SSL/TLS” in the field at the top to easily find the application. Select the link to Domains.

- To view certificate details, select the link to ‘SSL/TLS’ (the plain one that does NOT have a question mark).

- On the page that appears, look for ‘Install and Manage SSL for your site (HTTPS)’ and select ‘Manage SSL sites’.

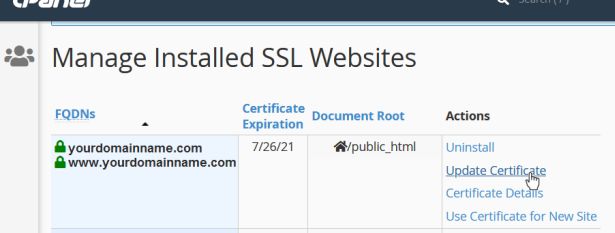
- A list of your domain(s) will appear under the heading “Manage Installed SSL Websites” in the SSL/TLS section. Beside the domain, there will be a list of actions. Choose ‘Certificate Details’ to view the ID, Domain, Issuer, Key, and most important: Expiration date.

If you see that your certificate is about to expire, you can manually update the certificate. However, using AutoSSL may be much simpler; please refer to the renew existing certificate(s) instructions above.
Related:
cPanel: Securing your CrossWinds hosted site with HTTPS